Over the past few years, I’ve seen many different types of application implementations on the OpenShift platform (Red Hat’s Enterprise Distribution of Kubernetes). There are many pros and cons for using the different methods. But, at this point, there is no common template to recommend for everyone’s use case. This is what makes Infrastructure as Code so interesting.
In this post, I’ll cover three patterns for integrating monitoring agents with your OpenShift applications. We’ll use a Java application as an example with a New Relic agent as the piece to be integrated with.
We’ll cover three use cases:
- Agent is part of the base application container image. We use “all-in-one” images, where the agent’s components are delivered as part of the main image. This is the most common use case I see. Why? Because at the time when people started adopting OpenShift, this was the only way to achieve their goal, and this practice has continued. It makes sense for some cases, but with the current capabilities provided by the platform, many improvements are possible.
- Agent artifacts are provided as a sidecar container. This allows you to decouple the agent from the application and run it separately. It’s good for agents that monitor file systems and send results somewhere (for example, log analysis). This is particularly useful in scenarios where we have 2 separate processes running that need to communicate. In the Java world this is a rare situation because most Java agents come as jars that need to be loaded into the JVM’s classpath. The biggest downside to this is that we need to run 2 containers all the time. So if our secondary container provides just a static binary/file, we are wasting additional resources and making OpenShift’s scheduler work harder.
- Init Containers (my favorite one, and the “right one” in my humble opinion). We have a main application container that contains only application code on top of a runtime (and maybe even without a runtime!). Anything else, such as the agent binaries, are delivered by an Init Container. It allows us to have separate life-cycle management for both our application and the agent binary. For the following example, you can find all the code and templates in git repository
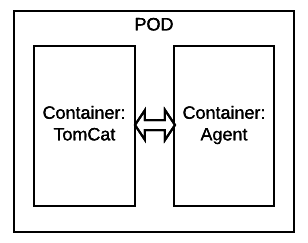
In this image, the agent is part of the container in the same pod:

As this scenario is commonly known and understood, I won’t describe all the steps for deploying the New Relic agent, but I will demonstrate this scenario with a really simple example.
Note: I would definitely recommend using base images from trusted and certified parties, like Red Hat. If you are not in the image building business yourself, you will save yourself trouble over the long term.
We will use JBoss Web Server 3.0, (Red Hat’s supported distribution of Tomcat) image as our base. We will also use OpenShift builds that take the base image from current namespace/project and add layers on top producing a new image as a result. In this example, we’re embedding the Dockerfile in the BuildConfig definition so we can avoid using a version control repository. We can add binaries or any other required changes to the image definition and be all set.
Also, we define image triggers so that the build happens automatically by the platform every time the base image is updated by the vendor — Red Hat, in this example.
...
  output:
    to:
      kind: ImageStreamTag
      name: jboss-webserver30-tomcat7-jdk7-openshift:latest
  postCommit: {}
  resources: {}
  runPolicy: Serial
  source:
    dockerfile: "FROM registry.access.redhat.com/jboss-webserver-3/webserver30-tomcat7-openshift\nUSER
root\nRUN echo 2 | /usr/sbin/alternatives --config java \nRUN echo 2 | /usr/sbin/alternatives
--config javac\nENV JAVA_HOME=/usr/lib/jvm/java-1.7.0 \nENV JAVA_VERSION=1.7.0
\nUSER 185"
    type: Dockerfile
  strategy:
    dockerStrategy:
      from:
        kind: ImageStreamTag
        name: jboss-webserver30-tomcat7-openshift:latest
    type: Docker
...
The image produced as the result of this build can be then used as a base image for all your applications, as now they will all have the changes you require.
You can use this same approach to add the binaries for the New Relic agent on top of an existing image.
Here is the full example: https://github.com/mjudeikis/ocp-app-agent-example/blob/master/allinone-pattern/template.yaml
In this example, we’ll use the well-defined sidecar design pattern . The image below shows a pod running 2 containers that share a common area:

We’ll build a second container that we’ll use as a sidecar and that will run side-by-side with our main application container. (You can find the source code for this sidecar container in the github ).
This image just holds the agent binaries, and all required configuration will be mounted as a Secret and a ConfigMap, following guidance from the twelve-factor application development methodology.
Let’s create a project for this use case:
oc new-project sidecar-mon
We’ll build New Relic sidecar container:
oc new-build https://github.com/mangirdaz/ocp-app-agent-example --context-dir=sidecar-pattern/container --name=newrelic-sidecar
Next, we need to create a Secret and a ConfigMap for this agent:
#create secret for API KEY
oc create secret generic newrelic-apikey --from-literal=API_KEY=b57f9f51b1ba14b891509c42218b82f1830xxxx
#create configmap from file in sidecar-pattern/container/newrelic
oc create configmap newrelic-config --from-file=newrelic.yml
Here is an example of 2 containers running together in the same pod:
   #sidecar container, which provides agent binaries
 - image: mangirdas/newrelic-sidecar:latest
   name: newrelic
   volumeMounts:
   #shared volume space betwean 2 containers.
   - mountPath: /newrelic
     name: newrelic-volume
   #mounting agent configuration to the sidecar
   - mountPath: /newrelic-config
     name: newrelic-config
 - image: ${APPLICATION_NAME}:latest
   imagePullPolicy: Always
   name: ${APPLICATION_NAME}
   env:
   - name: NEW_RELIC_APP_NAME
     value: ${APPLICATION_NAME}
#set API key from secret as environment variable
   - name: NEW_RELIC_LICENSE_KEY
     valueFrom:
       secretKeyRef:
         name: newrelic-apikey
         key: apikey
   - name: CATALINA_OPTS_APPEND
     value: ${CATALINA_OPTS_APPEND}
   #in New Relic case this is mandatory. Otherwise agent will log to file and running container will start growing.
   - name: NEW_RELIC_LOG
     value: "STDOUT"
The most important thing to note when using this pattern is that the sidecar container will copy files on the main container into a shared location at startup time. This is accomplished using a shared filesystem and accessible through each container’s volume mounts. This is done in the container/sleep.sh script. Now that we have ConfigMaps and Secrets created, we can deploy:
oc process -f https://raw.githubusercontent.com/mjudeikis/ocp-app-agent-example/master/sidecar-pattern/template/template.yam -p APPLICATION_NAME=example-app | oc create -f -
#This will start build and trigger deployment too
oc start-build example-app
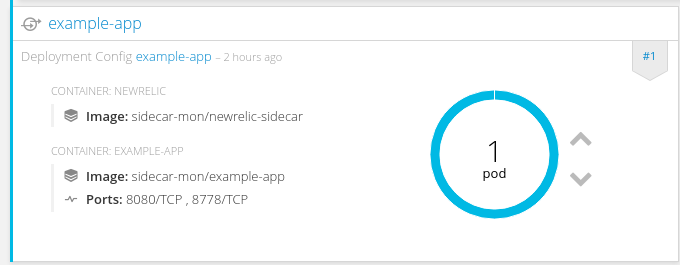
Below is the sidecar deployment with 2 containers in the pod:

The result is one single pod running with two containers. There is one for the main application and a secondary container (sidecar) providing binaries for logging using the shared filesystem (emptyDir) functionality. That one will mostly sleep.

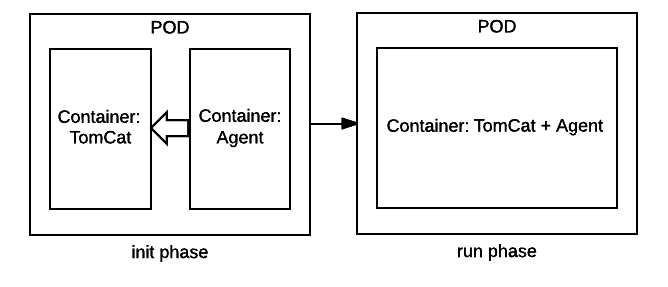
Here is an init phase agent being provided to main container and moved to run phase:

Here we’ll use a similar container for the agent, providing the binaries to our main application. But in this case, the container will copy the binaries to the application container on startup and will be then destroyed as part of the pod startup life cycle. It can be compared to pre-start hooks from Openshift V2 or hooks from LXE advanced container usage patterns.
Let’s create a project for this use case:
oc new-project init-mon
Let’s see it in practice:
#lets build newrelic container for init phase
oc new-build https://github.com/mangirdaz/ocp-app-agent-example --context-dir=init-pattern/container/ --name=newrelic-init
#create secrets, same as in case 2
cd init-pattern/container/newrelic
oc create secret generic newrelic-apikey --from-literal=API_KEY=b57f9f51b1ba14b891509c42218b82f1830exxxx
oc create configmap newrelic-config --from-file=newrelic.yml
#create template application stack
oc process -f https://raw.githubusercontent.com/mangirdaz/ocp-app-agent-example/master/init-pattern/template/template.yaml -p APPLICATION_NAME=init-example | oc create -f -
oc start-build init-example
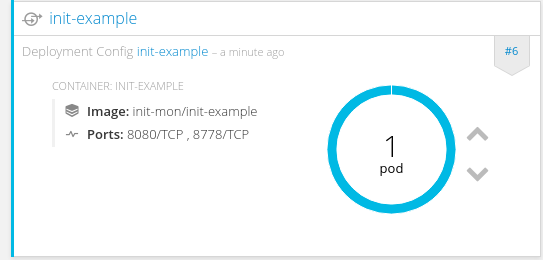
In this case, our deployment looks a little bit different.
Note: Currently, Init Containers are defined in annotations, and so we use images directly from the Docker Hub. This is because we use Openshift GA 3.5, which does not yet have full Init Container integration. But from Openshift 3.6/Kubernetes 1.6 there will be a new syntax to declare an Init Container in the Deployment and DeploymentConfig and a standard way to deploy from ImageStreams will be supported.


In this case, if you need to update the agent, you will just need to rebuild the Init Container image and restart the affected applications.
This is a very valuable pattern for organisations who want to maintain application components separately. Some great examples of this are JDBC drivers provided by database engineering teams, agents provided by monitoring teams, and secondary run-time binaries that can be maintained independently and managed by separate teams (for example, Java and Tomcat).
Below are the results for in both cases. The application data is visible in New Relic monitoring tool dashboard:

Conclusion: We have seen that there are multiple ways to do things in OpenShift and Kubernetes, with no “one true way.” OpenShift is rapidly evolving and new capabilities are being delivered with each release. For each challenge there is a solution. You just have to know your options to find the solution that best suits your needs.
Init Containers will give you tools to manage your applications in almost any imaginable scenario. With these tools, you’ll be able to construct the most complex and amazing application deployment patterns. Together with StatefulSets, Init Containers brings true power to your datacentre and enables fast and rapid development.
Also, remember that these patterns can be used and abused. As you already know, with great power comes great responsibility.